Using Microsoft Teams in the Primary Classroom

Using Microsoft Teams in the Primary Classroom

The past 12 months have seen a huge increase in our reliance on online learning platforms. With various lockdown stages across the country, and worldwide, teachers have been thrown into remote learning or even hybrid teaching with minimal notice to prepare.

The use of Microsoft Teams across education grew exponentially during 2020 with Microsoft¹ stating more than 230,000 educational institutions were using Microsoft Teams by Sept 2020.

By far one of the main draw cards of Teams is the ability to centralise access to resources and other tools used in the classroom. Teams allows teachers to provide students with one location to access content needed for each lesson regardless of whether students are learning face to face or remotely.

¹ New features in Teams and OneNote support social-emotional learning approaches

What about the littlies?

One explicit issue that many primary schools face is how to use Microsoft Teams with younger grades. Students in years 3-6 generally cope quite well but how about Kindy through to year 2?

How are younger grades meant to utilise Teams when often they are still learning to read, certainly can’t spell yet and let’s be honest, can have the attention span of a goldfish?

Using Microsoft Teams in the Primary Classroom

Here I look at just some of the techniques that schools and teachers can use to allow student engagement and inclusion using Microsoft Teams.

General Ideas

Firstly let’s look at some general ideas to keep those little ones engaged and active in the Teams environment.

Navigation of Teams

A big hurdle for younger students is navigation and understanding where to click within the Teams environment. For students who are learning face to face, we have the advantage of being able to ease them into the process and actively show them on screen where things are located. But for remote students, this is much more difficult. Creating a foundation to begin with where students understand the different areas of Teams and when to go there is vital. I’ve seen some great suggestions online for this over the past 12 months and so here are some great tips.

Laminate Icon Signage

Laminate signs of the Teams icons to hold up during meetings. Print out these cue cards, mount on some cardboard for stability and hold these up when you want to identify to students where they should click.

Feel free to click on each of the icons below and save a copy.

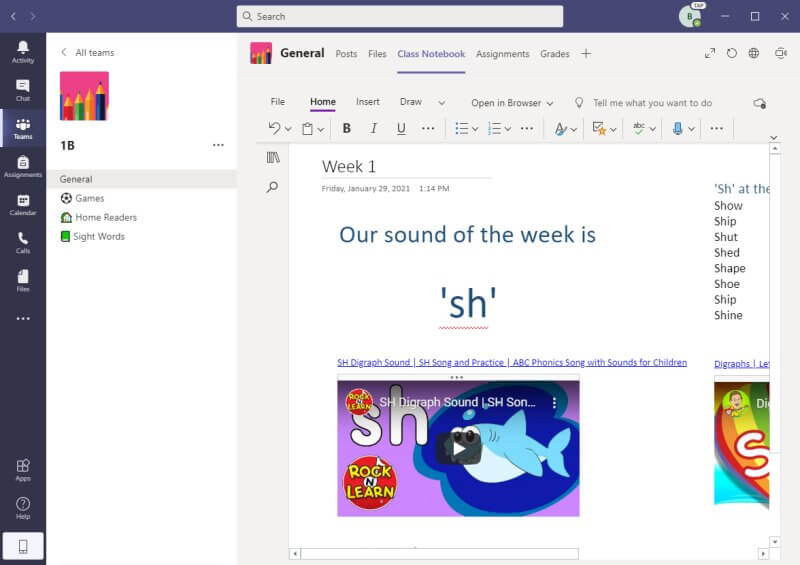
Use Emojis in your channel names

Teams allows you to add Emoji’s into your channel names which can make it much easier for students to identify where they should be. E.g. “Go to the Sight words channel with the book picture next to it.”

To add an emoji to your channel name:

  1. Hover over the channel you wish to edit
  2. Click the ellipsis (…) button on the right of the channel name
  3. Select Edit this channel from the menu
  4. Place your cursor at the position you would like to add the emoji
  5. Press the Windows key + full stop key on your keyboard

The Emoji keyboard will appear

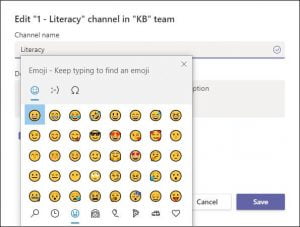
  1. Browse through the Emoji keyboard and double click to add any of the icons into your channel name
  2. Click Save

As an added bonus you can also use Emojis in your tab names when you add them into each channel. 

Using Microsoft Teams in the Primary Classroom
Add emojis to your channel tabs

Other great ideas

Virtual Excursions

There are lots of great virtual excursion experiences available online now. Provide students with a link to go and visit:

Zebras & Giraffe at Melbourne Zoo

Videos Galore

YouTube videos are going to grab attention and get those little ones engaged. Add video content into channels, a Class Notebook or any other spot you can think. 

Embed videos in Teams

Integrate with other apps

Centralisation – get as much into the one location as possible. The easier and more centralised we can make Teams, the easier it will be for younger students to navigate and find what they are looking for. 

Microsoft Teams can integrate with a wide range of third-party apps, and as a bonus, the list is growing every month.

There are so many fantastic teaching resources online and even as the teacher you may find yourself overwhelmed with accessing different platforms.

Straight off the bat, Teams will integrate seamlessly with platforms including Flipgrid, Kahoot, Nearpod, Pear Deck, Polly, Smart Learning Suite, Wakelet, and YouTube.

Using Microsoft Teams in the Primary Classroom

Even if you are using applications such as Seesaw or ClassDojo, these may not yet have a direct integration available but that doesn’t mean you cannot use them within Teams. Teams will let you integrate any website as a custom tab so the list is really endless as to what you can give students access to from within your class team or channel.

Engage remote students

If you have students who are learning remotely then you will need to use different tactics to engage those students versus those who are learning in person. Microsoft Teams has rolled out several features which are aimed at student engagement during remote learning. Alongside those features there are also some other tactics you can use.

Teams features for remote learning

Some of the key features which have been incorporated into Teams for remote learning include:

Use the Whiteboard with students

Other suggestions include:

  • Simplify content where possible
  • Keep live meetings brief
  • During live meetings, record the meeting for students who may have missed it
  • Add Stream channel to each Team with lesson recordings

Running live meetings

Oh the joy of an online meeting. Running an online meeting with a group of adults can be challenging enough, but switch it up and add in a bunch of 6 year olds and you have pure mayhem. Once those kids work out how to mute each other, mute the teacher, umute themselves, run their own meetings, then it’s just chaos. Online meetings can be overwhelming for younger students so there are some techniques you can use to minimise the chaos and maximise student inclusion.

Break out rooms

Use break out rooms to split your class into smaller groups and then call them back to the main meeting when you are ready for them. As the meeting organiser you can pop in and out of each break out room as needed to assist students and check progress.

A few tips for using Break out rooms:

  • You must be the meeting organiser
  • Ensure you use the Teams desktop client, this feature is not available in the online version
  • You must be in a private scheduled meeting (including recurring meetings), or private meet now meeting, not a meeting which is part of a channel.

To create break out rooms via a scheduled meeting

  1. Schedule a meeting via the Calendar and add students in but do not assign the meeting to a Team or channel
  2. Send the meeting invite
  3. When the meeting time arrives, join the meeting as normal
  4. From the meeting toolbar, click the Breakout rooms button

Click the Breakout rooms button

  1. You will now see the Create breakout rooms window

The Create breakout rooms window will appear

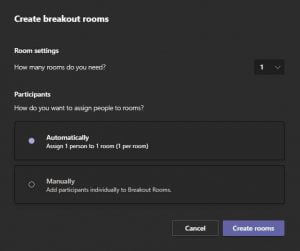
  1. You can choose the number of break out rooms you would like plus how you would like to assign participants
  2. Select your preferences and click Create rooms
  3. You will now be able to assign participants as needed

Assign participants to break out rooms

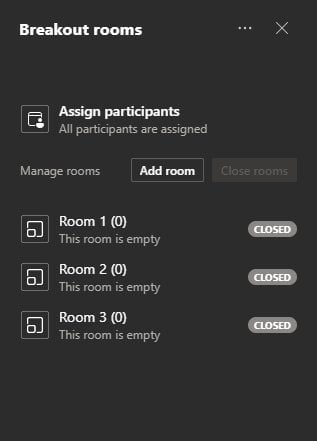
  1. When you want all students to return to the main meeting, click the Close rooms button.

Share your screen to demo

Share your screen and demonstrate what you are doing so that students get a visual representation of the lesson.

Use a second monitor or device

If you are remote teaching I highly recommend the use of a second monitor. This will let you easily view your students, chat and more at the one time.

If dual monitors are not possible, but you have a device such as an tablet, then access using both your computer and device so you have the ability to see your students but also screen share at the same time.

Dual Screens for Live Meetings

Use chat to share links

Students may not yet be able to type anything into chat that makes sense but they sure will work out how to click a link to a specific resource.

Fun interactive games

Finally, it’s game time. Who doesn’t love a good game to break up activities. There are lots of different games you can play online but again remember to bring them all together and have the games easily accessible via a dedicated channel.

You can directly share game links through the Posts tab in Teams or create a dedicated tab within the channel for each game interface. 

If you haven’t checked out Kahoot then it’s very much worth a look to create and assign challenges and play live games. 

I’m a fan of games using PowerPoint so you can easily upload each game file into the channel and share it via a tab for easy access. Students can open their own copy to play themselves.

Interactive Games in Microsoft Teams

Some ideas for games include:

  • Scavenger Hunt
  • Live spelling test using Forms
  • Play Jeopardy using PowerPoint

Watch It Now

Want to watch my session? Check out the recorded session now. 

Scroll to Top